How to Drill a Water Well in Kenya — Step by Step
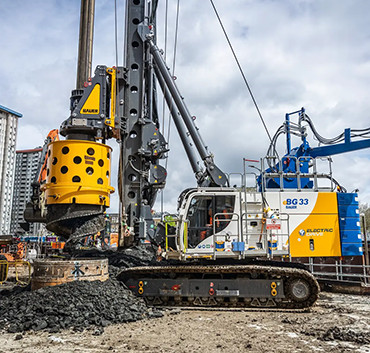
Drilling a water well in Kenya involves more than pointing a rig at the ground and pushing down. Done correctly, you get a productive borehole that serves a community or estate for 20+ years. Done incorrectly, you get a dry hole, a collapsed formation, or a borehole that fails water quality tests.
This guide covers every step in sequence — from permits and site selection through to pump installation and handover.
Before You Drill: Regulatory Requirements
Borehole drilling in Kenya is regulated. You cannot legally drill without the correct approvals.
Water Resources Authority (WRA) Permit
The WRA is the primary regulatory body for groundwater in Kenya. Any borehole drilled for commercial, community, or significant private use requires a drilling permit from the WRA before work begins.
To obtain a WRA drilling permit: <ul> <li>Submit an application to the relevant WRA regional office</li> <li>Include site location (GPS coordinates), proposed depth, intended use, and yield target</li> <li>Processing time: typically 2–6 weeks depending on the region</li> <li>Fee schedule is set by the WRA and varies by borehole size and use</li> </ul>
Residential boreholes on small private plots may fall below the permit threshold — confirm with your local WRA office.
NEMA Assessment
For larger community or commercial boreholes, the National Environment Management Authority (NEMA) may require a project registration or Environmental Impact Assessment (EIA). This applies primarily to projects with significant abstraction volumes (municipal supply, agro-industrial, mining).
Driller Registration
Only licensed drilling contractors are permitted to drill boreholes in Kenya. Verify that your contractor holds a current WRA drillers' licence before mobilising.
Step 1: Hydrogeological Survey and Site Selection
The most important decision in any borehole project is where to drill. A survey done properly can be the difference between a 5 m³/hr well and a dry hole.
Methods used for siting in Kenya:
- Electrical Resistivity Tomography (ERT): The most reliable method for basement aquifer targeting. Identifies fracture zones and weathered rock at depth. Cost: KES 40,000–120,000 depending on survey length.
- VES (Vertical Electrical Sounding): Older technique, still widely used. Less accurate than ERT for fractured basement but faster and cheaper.
- Aerial photo / satellite analysis: Useful for identifying lineaments (surface expressions of fractures). Preliminary step, not a substitute for ground survey.
Kenya-specific siting notes: <ul> <li>In basement areas (Central, Eastern, North Rift), target fracture intersections — not flat open ground</li> <li>In the Rift Valley, look for faulted zones in volcanic sequences</li> <li>Avoid siting boreholes within 50m of latrines, septic tanks, or surface water in sedimentary or alluvial areas</li> </ul>
Step 2: Confirm Geology and Select Equipment
Kenya has three main drilling environments. Equipment selection differs significantly between them.
Crystalline Basement (Central, Eastern, Rift margins)
Rock types: granite, gneiss, quartzite, schist. <ul> <li>Hard to very hard (UCS 100–200+ MPa)</li> <li>Target aquifers: fractured zones at 60–180m</li> <li><strong>Equipment:</strong> 5" or 6" DTH hammer, 6.5"–7" spherical button bit (hard carbide grade), 300–500 CFM compressor</li> </ul>
Rift Valley Volcanics (Nakuru, Naivasha, Baringo, Turkana)
Rock types: trachyte, phonolite, basalt, ash layers. <ul> <li>Variable hardness — can be highly abrasive in fresh trachyte</li> <li>Vesicular zones can be productive aquifers</li> <li><strong>Equipment:</strong> 5"–6" DTH hammer, 6.5"–7" semi-ballistic or spherical bit, 300–500 CFM</li> </ul>
Coastal Sedimentary / Alluvial (Mombasa, Kilifi, Malindi)
Rock types: coral limestone, sandstone, alluvial sand/gravel. <ul> <li>Softer formations, shallower aquifers (15–60m)</li> <li>Casing and screen design critical</li> <li><strong>Equipment:</strong> Rotary mud or DTH with flat-face bits; heavy UPVC casing from surface</li> </ul>
Step 3: Mobilise and Set Up the Rig
Once permits are in hand and the site is confirmed:
- Rig: Most standard community boreholes in Kenya use a truck-mounted DTH rig (crawler or truck) with 300–600 CFM compressor
- Water supply: Air drilling requires water for initial surface drilling and bit cooling — arrange a 5,000–10,000L water bowser on site
- Site preparation: Clear 10m × 10m working area, set up sumps to capture return cuttings
- Safety: Mark the borehole location and exclusion zone. Drilling supervisor must be on site at all times.
Step 4: Drill the Borehole
Phase A — Surface Casing (0–15m)
Begin with a larger bit to accommodate surface casing: <ul> <li>Use a 9"–10" bit to drill through loose overburden and weathered rock</li> <li>Install steel surface casing (typically 8" diameter) cemented in place</li> <li>This protects the borehole from surface water contamination and prevents collapse in unconsolidated materials</li> </ul>
Phase B — Main Hole (15m to Target Depth)
- Switch to the production bit size (typically 6.5" or 7" in Kenya)
- DTH drilling begins in earnest once in competent rock
- Log cuttings at every metre — note colour, hardness, and any change in formation
- Watch for drilling fluid changes: loss of circulation can indicate fracture zones (potential aquifer)
- Expected penetration rate in Kenyan basement: 5–20 metres per hour depending on formation and bit condition
- Replace bits when penetration rate drops significantly — worn buttons in hard granite dramatically reduce efficiency
Phase C — Aquifer Identification
Productive fractures in basement rock often announce themselves: <ul> <li>Increased air return with water</li> <li>Change in cuttings colour (weathered or bleached rock along fractures)</li> <li>Sudden loss of circulation</li> </ul>
When you hit a likely productive zone, note the depth and continue to the planned total depth. A single fracture at 80m is good; intersecting two or three fractures at different depths is better.
Step 5: Install Casing and Screen
Once the borehole reaches target depth:
- Conduct a caliper or air lift test to confirm productive zones
- Select screen interval — position slotted UPVC screen opposite the productive fractures
- Install UPVC casing string from surface to bottom — blank casing in non-productive zones, slotted screen at aquifer intervals
- Gravel pack the annulus around the screen section (clean 3–6mm gravel)
- Cement seal from surface to base of steel surface casing — prevents contamination
Standard Kenyan specification for community boreholes: 6" UPVC casing, 5" slotted screen, drilled with 7" DTH bit.
Step 6: Borehole Development and Yield Test
A new borehole must be developed before pumping for use:
- Air lift or surge the borehole to break down any drilling mud or fine material around the screen
- Continue until return water runs clear
- Conduct a pumping test: typically 24-hour constant rate test + 12-hour recovery
- Calculate sustainable yield (m³/hour) and dynamic water level
- This data is required for WRA completion records and for pump sizing
Step 7: Water Quality Testing
Before any borehole is put into use, the water must be tested:
Minimum test parameters for Kenya: <ul> <li>Bacteriological: E.coli and Total Coliforms (Kenya Environmental Management and Co-ordination Act requirement)</li> <li>Physical: pH, turbidity, conductivity, total dissolved solids</li> <li>Chemical: fluoride (elevated in Rift Valley), nitrates, iron, manganese</li> </ul>
Send samples to a KEBS-accredited water testing laboratory. Results in 3–7 days.
If fluoride exceeds WHO/KEBS limits (common in parts of Rift Valley), a defluoridation unit is required before the water can be used for drinking.
Step 8: Pump Installation and Handover
Select the submersible pump based on the yield test results:
| Borehole Yield | Pump Size | Power |
|---|---|---|
| 1–5 m³/hr | 4" submersible | 0.75–1.5kW |
| 5–15 m³/hr | 5" submersible | 2.2–4kW |
| 15–40 m³/hr | 6" submersible | 4–11kW |
Set the pump at least 10m above the expected dynamic water level at maximum pumping rate. Install a rising main, wellhead seal, and surface discharge arrangement.
Issue the client with: <ul> <li>As-drilled borehole log</li> <li>WRA completion certificate (submit within 90 days of completion)</li> <li>Pumping test report</li> <li>Water quality certificate</li> <li>Pump installation record and warranty</li> </ul>
Summary
A well-executed Kenyan borehole project follows this sequence:
- WRA permit obtained before drilling
- Hydrogeological survey done — site selected on data, not guesswork
- Equipment matched to formation type
- Casing and screen design matched to aquifer depth
- Development and yield testing completed before pump installation
- Water quality confirmed before handover
At Global Edge, we supply the full DTH equipment package for Kenyan water well projects — hammers, bits, air compressors, UPVC casing, and submersible pumps — with fast delivery from Abu Dhabi and free technical support from a team with Kenya drilling experience.
→ Drilling Equipment for Kenya → Browse DTH Bits and Hammers → Request a Quote → Water Well Drilling in West Africa
Zero rig downtime starts with parts already on the shelf.
Not sure of your exact hammer or bit spec? Send a photo on WhatsApp — we verify shank, thread and diameter against Abu Dhabi stock and send part numbers + landed price to your port within 4 working hours. Free, no obligation. Backed by a 90-day replacement guarantee and 48–72h air dispatch.